Please login to see this lesson.
Category: OSU Web Design
CS 195 course
Site Hosting
Please login to see this lesson.
What is JavaScript (JS)?
PurposeExamplesSyntaxTest
Purpose
 JavaScript (JS) is a client-side scripting language that can be embedded into HTML files. Most modern browsers interpret this language to support object-oriented and procedural programming which controls web pages in the browser, on a web server, and inside mobile applications.
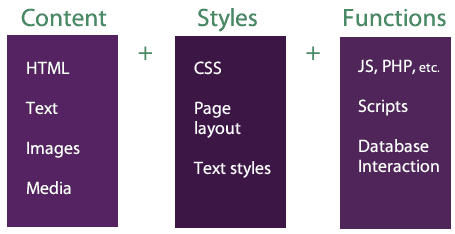
While Hypertext Markup Language (HTML) gives web pages basic structure and marks content, it is the Cascading Style Sheet (CSS) that defines how that page structure and content should look. In addition, scripts like JavaScript and HyperText Preprocessor (PHP) add functions to control windows, data structures, files and folders, media, forms, and microinteractions, etc.
Examples
JavaScript Syntax
Typing JavaScript requires basic syntax, which follow these rules:
- Most scripts are provided in external files but some are embedded in the
headarea, under thefooter, or inline within HTML elements. - Each embedded script gets a beginning
<script>and ending</script>tag. - Function names are written in lowercase letters.
- Semicolons are placed at the end of each function.
- Functions must be nested, not overlapped.
- Some scripts work best in the
headarea of a web page. If that isn’t required by the script then it should be loaded at the bottom of the page to increase rendering speed. - External JavaScripts need a .js file extension.
In this course, you will be adding functions inside HTML elements/tags as well as linking to external JavaScript source files.
View the diagrams below in full screen mode to see the labels for each part of a JavaScript script.
Link to an external file:
<script src=”library.js“></script>
- Begin tag
- Source attribute
- File name or path value in quotations
- End function and statement
Inline function as an attribute and value inside an HTML element:
<a onload=”sound.play()”Play></a>
- Begin tag
- Function name
- Value in quotations
- End function and statement
A function in an external file:
var pets = pet(‘cat’, ‘dog’, ‘pig’);
- Define
- Variable name
- Function & values
- End function
Test
Simple online tools can test the syntax of JavaScripts, but exhaustive user-testing will ensure it works as intended and even more testing agains hacking scripts will ensure it is unhackable by bad actors.
JavaScript
 JavaScript and HTML DOM Reference
- W3 Schools
- JavaScript Validator
- CodeBeautify's JavaScript syntax validator
 jQuery Libraries
- Download the latest versions of jQuery.
 Smooth Scroll JavaScript
- By Robin Leve at Codepen
 Table Sort Javascript
- By Tristan. Includes scripts and styles.
 Table Sorting jQuery Library
- By Christian Bach. Minified version to include in the footer of your HTML file.
 Tether
- Tether is a JavaScript library for efficiently making an absolutely positioned element stay next to another element on the page.
What is HyperText Pre-Processor (PHP)?
PurposeExamplesSyntaxTestResourcesQuiz
Purpose
 Hypertext Pre-Processor (PHP) is a server-side scripting language that can be embedded into HTML files. It can be used to display the last date a page was modified, to include snippets of other code, to interact with databases, to send form data, and define and use variables.
While HTML gives web pages basic structure and marks content, it is the Cascading Style Sheet (CSS) that defines how that page structure and content should look. In addition, scripts like JavaScript and HyperText Preprocessor (PHP) add functions to control windows, data structures, files and folders, media, forms, etc.
Examples
PHP Syntax
Typing PHP requires basic syntax, which follow these rules:
- Each script gets a beginning
<?phpand ending?>tag. - Function names are written in lowercase letters.
- Semicolons are placed at the end of each function.
- Values for attributes are surrounded by single quote marks.
- Functions must be nested, not overlapped.
- Files which use PHP need a .php file extension.
View this page in full screen mode to see the each piece of PHP syntax labeled:
<?php echo ‘Hello world’; ?>
- Begin tag
- Function name
- Value in quotations
- End function and statement
Test
Tools for validating PHP accuracy and security:
Validator
 A PHP Code Checker
- Syntax Check for Common PHP Mistakes
 Cross Browser Testing
- Paid subscription for testing OS Browsers
") CSS, HTML, and Feed Validation (Unicorn)
CSS, HTML, and Feed Validation (Unicorn)
- W3.org's CSS, HTML, and Feed Validation (Unicorn)
 Email Markup Tester
- Google Webmaster Tools
 Favicon checker
- Find out why your favicons aren't rendering
- JavaScript Validator
- CodeBeautify's JavaScript syntax validator
 JS Hint
- A Static Code Analysis Tool for JavaScript
 PageSpeed Insights
- Google's tool to test page load time, with recommendations.
Resources
PHP
- A PHP Code Checker
- Syntax Check for Common PHP Mistakes
 PHP 5 Reference
- W3 Schools function reference
 PHP Tips, Resources and Best Practices for 2015
- SitePoint's Bruno Skvorc
 PHP: Hypertext Preprocessor
- Open Source official web site
 PHP: Language Reference
- PHP.net's manual
 PHP7 Resource Recap
- SitePoint's Bruno Skvorc
 Simple Techniques to Lock Down your Website
- Secure PHP scripts by Dustin Blake
PHP
Congratulations - you have completed PHP.
You scored %%SCORE%% out of %%TOTAL%%.
Your performance has been rated as %%RATING%%
Your answers are highlighted below.
Chat with the instructor in Canvas
[quick-chat room=”php” guests_visible=”1″ send_button=”1″]What are Cascading Style Sheets (CSS)?
PurposeExamplesSyntaxTestingResourcesQuiz
Purpose
 ‘
‘
While HTML gives web pages basic structure and marks content, it is the Cascading Style Sheet (CSS) that defines how that page structure and content should look. In addition, scripts like JavaScript and HyperText Preprocessor (PHP) add functions to control windows, data structures, files and folders, media, forms, etc.
Style sheets save web authors a great deal of time. Instead of adding specific styles to each piece of text, they are generally applied globally with a style sheet (.css file). A style can be defined in a style sheet file and applied automatically in other web pages. Style sheets control the look of text, the layout of the page, how graphics are displayed, and how layers interact with the mouse.
Styles can be applied in three ways:
- Inline: defined inside a tag using the
styleattribute.For this course, we will NOT be using inline styles.
-
Internal (embedded): defined in the
<head>and applied with a<style>tag.For this course, we will NOT be using embedded styles.
-
External (linked or imported) : Defined in a separate document with a
.cssfile extension and attached in the<head>section using a<link />tag.1External files define the look and page layout for an entire website; not just one page or element/tag. They can be named anything you want and you can link to more than one. It is customary to define styles for all known elements/tags, then define your own classes and IDs for additional customization. Typically, the font family, background, text colors, and page layout are defined in the external file.
The<link />tag references an external style sheet file, notes the relationship, and can optionally note the media type in separate attributes:1
2
3<link rel="stylesheet" href="screen.css" media="screen" />
<link rel="stylesheet" href="print.css" media="print" />
<link rel="stylesheet" href="mobile.css" media="handheld" />For this course, we will be using external stylesheet files and the main file will include media queries to keep the site responsive to device sizes.
The Cascade
Style definitions/declarations are applied using a cascading method. In its simplest terms, the cascade works like this:
| Linked external style sheet is overruled by |
| Imported external style sheet, which is overruled by |
| Embedded/internal document level style sheet, which is overruled by |
| Inline style definition. |

Dan Hitchcock of UCLA Extension explains the Cascade effect in CSS. More specific control belongs to the visitor via their browser. The next level of control belongs to the web developer when using !important with a definition inline, then any inline style, then any embedded style in the <head> section of a document, then styles at the bottom of a .css file. Using !important in the .css file overrides the same declaration made earlier in the document.
Examples of CSS

CSS Syntax
Note that CSS uses element names, curly braces, colons, and semicolons. In some cases, a space or comma is also needed. View the diagram below in full screen mode to see the labels for each part of a style declaration.
h1 { color:white; font-size:200%; }
- Tag, selector, element
- Property
- Value
- Property
- Value
Testing
The following tools can test the validity of styles to help keep code ‘clean’ and easy to read by machines and humans. The Unicorn validation service by W3.org is the most commonly-used tool, which is required for each lesson in this course.
Validator
- A PHP Code Checker
- Syntax Check for Common PHP Mistakes
- Cross Browser Testing
- Paid subscription for testing OS Browsers
- CSS, HTML, and Feed Validation (Unicorn)
- W3.org's CSS, HTML, and Feed Validation (Unicorn)
- Email Markup Tester
- Google Webmaster Tools
- Favicon checker
- Find out why your favicons aren't rendering
- JavaScript Validator
- CodeBeautify's JavaScript syntax validator
- JS Hint
- A Static Code Analysis Tool for JavaScript
- PageSpeed Insights
- Google's tool to test page load time, with recommendations.
Resources
Cascading Style Sheets (CSS)
 :nth Tester
- Use :nth selectors to test parent child selections
 Autoprefixer CSS
- Add CSS3 vendor prefixes and remove unnecessary ones
 Can I use…
- Which HTML and CSS3 features work on which versions of which browsers?
 CSS Almanac
- Selectors and Properties comprehensive index
 Sample") CSS Custom Properties (CSS Variables) Sample
CSS Custom Properties (CSS Variables) Sample
- Google's implementation occurred in Chrome 49 of 2016
 CSS Grid articles
- CSS-Tricks demonstrates and explains explicit and implicit, galleries, and page layout using grids
 CSS Specificity: Things You Should Know
- Smashing Magazine 2007
 CSS you can get excited about in 2015
- Rachel Andrew of Webdesigner Depot: Calculations, blends, level 4 selectors, grid columns and rows
- CSS, HTML, and Feed Validation (Unicorn)
- W3.org's CSS, HTML, and Feed Validation (Unicorn)
 Normalize.css
- Make browsers render all elements more consistently.
 Pleeease ·
- Node.js application that easily process your CSS. It simplifies the use of preprocessors and combines them with best postprocessors. It helps create clean stylesheets, support older browsers and offers better maintenability. This means no more Compass for prefixes, no more rem mixins, and so on.
 Specifics on CSS Specificity
- CSS-Tricks 2010
 The Future Generation of CSS Selectors: Level 4
- Louis Lazaris, SitePoint, 2015
 Using CSS gradients – CSS | MDN
 Why I'm Excited About Native CSS Variables
- Philip Walton, Dec, 2015
What is CSS?
Congratulations - you have completed What is CSS?.
You scored %%SCORE%% out of %%TOTAL%%.
Your performance has been rated as %%RATING%%
Your answers are highlighted below.
Chat with the instructor in Canvas
[quick-chat room=”css” guests_visible=”1″ send_button=”1″]What is HyperText Markup Language (HTML)
PurposeExamplesSyntaxTestingResourcesQuiz
Purpose
 Hypertext Markup Language (HTML) is a set of elements/tags applied to text and images in plain text files which tell browsers how to display text, position graphics and form items, and display links to other pages. HTML can be used in conjunction with other languages such as Cascading Style Sheets, JavaScript, PHP, ASP, Ruby, etc. to provide unlimited functionality and interactivity.
HTML5 is the most current version of this standard markup language. Older versions still in use include HTML 4 and XHTML 1.1. These older versions do not take advantage of HTML 5’s:
- Semantic language to improve accessibility (for humans and machines)
- Improved media embedding
- Simpler interactive form functions
- Consistent page layout
Typically, content is kept separate from styles and functions so that updating and upgrading can be seamless. Styles are controlled by Cascading Style Sheets (CSS) and Functions are controlled with JavaScript, AJAX, PHP, and other scripting languages.

Examples of HTML

HTML Syntax
Typing HTML requires basic syntax, which follow these rules:
- Each line of text gets an element/tag at the beginning and end (unless the tag is self-closing).
- Tag names are written in lowercase letters.
- Attributes within tags are written in lowercase letters.
- Values for attributes are surrounded by quotation marks (inch marks).
- Tags within tags must be nested, not overlapped.
View the diagrams below in full screen mode to see the labels for each part of an HTML element.
<h1>First headline</h1>
- Beginning tag, selector, element
- String of text
- Ending tag, selector, element
This element syntax is referred to as “self-closing”:
<img src=”pic.jpg” alt=”text” />
- Beginning tag, selector, element
- attribute
- value
- attribute
- value
- Self-closing tag, selector, element
Testing
The following tools can test the validity of styles to help keep code ‘clean’ and easy to read by machines and humans. The Unicorn validation service by W3.org is the most commonly-used tool, which is required for each lesson in this course.
Validator
- A PHP Code Checker
- Syntax Check for Common PHP Mistakes
- Cross Browser Testing
- Paid subscription for testing OS Browsers
- CSS, HTML, and Feed Validation (Unicorn)
- W3.org's CSS, HTML, and Feed Validation (Unicorn)
- Email Markup Tester
- Google Webmaster Tools
- Favicon checker
- Find out why your favicons aren't rendering
- JavaScript Validator
- CodeBeautify's JavaScript syntax validator
- JS Hint
- A Static Code Analysis Tool for JavaScript
- PageSpeed Insights
- Google's tool to test page load time, with recommendations.
Resources
HTML5
- CSS, HTML, and Feed Validation (Unicorn)
- W3.org's CSS, HTML, and Feed Validation (Unicorn)
 HTML Reference
- W3 Schools: Simple descriptions of elements, attributes, and values.
 HTML Tutorial
- HTML5 from W3 Schools
 W3.org HTML5 Reference
- Official working reference
HTML5
Congratulations - you have completed HTML5.
You scored %%SCORE%% out of %%TOTAL%%.
Your performance has been rated as %%RATING%%
Your answers are highlighted below.
Chat with the instructor in Canvas
[quick-chat room=”html” guests_visible=”1″ send_button=”1″]Transfer a file to the Web Server
Web ServerSetup ScreensAdd ContentTransfer the fileTestScoringQuiz
Understanding your ONID Web Server
Your university provides each student, staff, and faculty with an email address, web server, and web database. If you have logged into that account, then you already have this information.
For the OSU Web Design course, you’ll need your ONID email address and information about your web server.
Login to your ONID account to see what your web address is. It should look something like this:
1 | http://people.oregonstate.edu/~onidusername/ |
The folder associated with this directory is the /public_html/ folder. All files for this course go in that folder. As the course progresses, you’ll add folders to this root folder. The /public_html/ folder is live to everyone with an internet connection. Only store public web files here.
The ONID servers are organized by the first initial of last names; some of these directories are on the /u1/ server and others are on the /u2/ server. When you mapped your hard drive to the public_html folder on your ONID web server, it was to one of those servers.
Web files typically are created on a local computer until they are copied to a web werver. The host company (OSU in your case) provides a user ID and password to allow access to your public space. When you login and transfer files you are using File Transfer Protocol (FTP). Some connections are secure and use Secure File Transfer Protocol (SFTP). When a hard drive is mapped mapped to the web server, it is using Secure Socket Shell (SSH).
Set up the Screens and preferences.

Code Editor Preferences
For BBEdit, update these Preferences:
- From the BBEdit → Preferences menu, choose Text Colors.

- If you prefer typing with ligher text on a dark background, change the Color Scheme to BBEdit Dark.


- From the Editor Defaults tab, click the Select button to change the default font to Verdana and the font size to 12pt or whatever is comfortable for your eyes.

For Notepad++, update these settings:
- From the Settings menu, choose Style Configurator.

- Update the font to Verdana and the font size to 12pt or whatever is comfortable for your eyes.

- If you prefer typing with ligher text on a dark background, change the Color Scheme to BBEdit Dark.


Add a folder and file for the first project.
Now that you have set up all the tools you’ll need to make a web page, you can start making a web site project! You’ll make a folder to hold your new project, begin writing a web page, transfer that file to the /public_html/ folder of your web server, and view it in the browser. Follow these instructions:
1. Make a project folder.
On your hard drive, make a folder for this course and for the first project.
- From the Finder/File Explorer of your hard drive, right-click and choose New folder.
- Name the folder CS 195 or Web Design.
- Inside that folder, create a new folder called about. Use only lowercase letters for this folder name.
2. Make a new text document.
This will be the first of many files you create.
- Open either BBEdit or NotePad++.
- File → New Text Document.
- Save the file as index.php into that about folder you made earlier. The .php file extension will allow us to use the PHP server-side scripting language along with Hypertext Markup Language (HTML).
Memorize these file-naming conventions:
- Leave out spaces, to avoid seeing ‘%20’ in the address bar of the browser.
- Use only lowercase letters, to avoid having to memorize which words are capitalized.
- Only use hyphens for filenames with two or more long words, to avoid complication.
- Don’t over-abbreviate, to help search engines name your files with plain English.
3. Write some code.
- Open the new file and erase any code that might be there. (If you made a PHP or HTML page instead of a TEXT file, then the file may have some code in it. Remove it. We’ll add our own.
- Copy and Paste this list of markup elements into your new page. We’ll turn these elements into HTML and PHP as we progress throughout the course.
1
2
3
4
5
6
7
8
9
10
11
12
13
14
15
16
17
18
19
20
21
22
23
24
25
26
27
28
29
30
31
32
33
34
35
36
37
38
39
40
41
42
43
44
45
46
47
48
49
50
51
52
53
54
55
56
57
58
59
60
61
62
63
64
65
66
67
68
69
70
71
72
73
74
75
76
77
78
79
80
81
82
83
84
85
86
87
88
89doctype
html language
head
php variables
var author
var sitename
var slogan
var sitepath
title
meta
charset
viewport
description
author
keywords
robots
links
css
fonts
favicon
scripts
modernizer
/head
body
header
image logo
headline 1 author
slogan
/header
nav
unordered list
/nav
main
article about me
headline 1 about
aside
paragraph about author
figure
image
figcaption
/figure
audio about author or music selection
/aside
headline 2 contact
address
name with anchor
address
city,state,zip
phone
contact anchor jumps to form below
/address
/article
article education
headline 2
dl list
/article
article work
headline 2
dl list
/article
article service
headline 2
dl list
iframe, video
/article
article skills
headline 2
table of skills and proficencies
/article
article fun
headline 2
figure gallery
img
figcaption
/figure
/article
/main
footer
contact form
social media icons a img
copyright
last date modified
/footer
scripts
jquery
prefix-free
/body
/html - Save the file.
- Update the
titleelement:- Add
<and>around the word ‘title’ in the list of elements you just added to the index.php file. These marks turn that word into a tag (or element), which is a command for the browser to display text in the tab of the browser. The search engines also read this title tag. - Just after the tag, write your name in upper and lowercase letters.
- After your name, close the tag with
</title>.

- Add
Transfer the file to the hard drive
With VPN active and your public_html web server mapped, can transfer the folder and file from your hard drive to the web server.

When you make updates to the files inside this folder, you can drag the folder again…just don’t drag the folder inside of itself! Avoid making /about/ folders inside the /about/ folder.
Now you have two copies of everything you did so far.
How often should you back up?
Every day! At the end of each editing session, back up the folder and its contents to a cloud drive and/or USB stick drive. Bad things happen even to the most careful people, so back up every day!
Test the file by viewing it in the browser
- Open the browser (Chrome) and navigate to your public folder on your ONID server. That address should look like this:
1http://people.oregonstate.edu/~**/about/index.php
Replace ** with YOUR ONID user name.
- If you can see your file, hurrah!
- Do you also see your name in the browser tab? If not, go back up to the Add Content tab of these instructions and revise the
<title>tag.
- Do you also see your name in the browser tab? If not, go back up to the Add Content tab of these instructions and revise the
- If you don’t see the file but instead see one of these messages:
- Internal Server Error: follow the Fix Permission Problems Tutorial.
- File Not Found error: you probably put the file in a different location than /about/. Check to see if it is in the /public_html/ folder of your ONID server. Check other folders if you have them. Save and/or Upload/Transfer the file again.
- Nothing: transfer the file again. Ensure you are uploading to the correct directory and are looking in the correct directory.
Scoring
Review these criteria.
This project will be scored using these criteria:
- The new folder and file reside on the ONID or ENGR server.
- About folder is named /about/.
- About page is named index.php.
- About page includes required markup element names.
- Student's name displays in the title tag (browser tab).
- The absolute address of the index.php file was submitted in Canvas.
- This assignment was submitted before the deadline.
Submit the page for scoring.
Copy the absolute address of your page and submit it in Canvas. It will look something like this:
1 | http://people.oregonstate.edu/~onidusername/about/ |
or this
1 | http://people.oregonstate.edu/~onidusername/about/index.php |
- Add a note about the number of hours you spent in design and production.
OSU Students: Review the scoring feedback in Canvas.
In your Canvas Grades area, click on the Comment icon on the right side of each assignment in the list. This will reveal the comments in a wider format for easy reading.
So that you progress and learn from mistakes, please read the scoring comments each week (usually by Wednesday).
If you are confused about the score comments, please reply in the Canvas Assignment Commenting area and I will review it. Click the Assignment name to reveal the Commenting box.

File Transfer Protocol
Congratulations - you have completed File Transfer Protocol.
You scored %%SCORE%% out of %%TOTAL%%.
Your performance has been rated as %%RATING%%
Your answers are highlighted below.
Chat with the instructor in Canvas
[quick-chat room=”transfer” guests_visible=”1″ send_button=”1″]Install Software
BrowsersCode EditorsFile TransferImage EditorsEnglishQuiz
Browsers
Web developers must use a variety of browsers for testing sites they build, since the world is free to choose their favorite surfing app. The platform and device will determine what is needed for viewing web sites.
For this class, Chrome is required because it is compliant with industry standards and renders this textbook website as intended. It also has helpful tools built in, such as color-coded source viewing:
- View → Developer → View Source
- Right-click → Inspect Element
Download the latest free versions as needed.
Download and use Chrome for the course; it is required!
Viewing on other browsers will be required later in the course to check the compatibility of design elements.
Explore Chrome
Once you install Chrome, explore to see how it works.
Address Bar
The search and address bar are the same! Type a keyword or phrase or URL in the box to reveal a list of options.
Refresh
Use the  button often while working; it will get the newest version of your page rather than use the cached version on your hard drive. In some cases, a ‘hard refresh’ (Shift ) is needed to get the supporting files (.CSS and .JS) from the server.
Viewing Source
So that you can see the course code/markup of other web pages, such as your peers in this class, or the instructor’s demo, click View → Developer → View Source. Note the keystroke and use it to save time!
This view will show the code with line numbers and colored tags. When asking a question about a problem in your page, provide the line number to speed up receiving a solution.

Using Inspect Element
To get more detail about a line of markup, inspect the markup and styles using Right-click → Inspect Element.


Chrome Window Layout Manager
Web designers need lots of windows open while they’re working, and to reduce the set-up time every day, use the Chrome ‘Layout Manager’ extension to allow Chrome to ‘remember’ where you placed the browser windows and tabs with your favorite pages open.
- Click on the Settings menu in Chrome and select → More Tools → Extensions.
- Scroll to the bottom of the list of extensions and click on Get More Extensions.
- Search for ‘Layout Manager’ and install it.
- In one browser window, set up all the tabs you want open for viewing: this textbook, your web page, the HTML validator, the CSS validator, and the Spell checker. Position the window so it takes up one-third of the window.
- In another window, open the Editor and Canvas so it takes up two-thirds of the screen width.
- Click on the blue Layout Manager button on the browser toolbar to Save Window Layout.
- Next time you are ready to work on the web design project, just click on the Load Window Layout button.
Browser Resources
Learn more about marketshare, security, and compatibility:
Browsers
 Browser market share
- Real-time daily browser, device, screen resolution, and social network data
 Browser Shots
- Check Browser Compatibility, Cross Platform Browser Test
 Browserling
- Live interactive cross-browser testing
 BrowserStack
- Live browser testing
- Can I use…
- Which HTML and CSS3 features work on which versions of which browsers?
- Cross Browser Testing
- Paid subscription for testing OS Browsers
 Free Virtual Machines
- from IE8 to MS Edge; hosted at Microsoft Edge Development
 How Browsers Work
- Behind the scenes of modern web browsers
 IE NetRenderer
- Internet Explorer Compatibility Check
- IE-on-Chrome
- Virtual IE for Chromebook and Macintosh
 Top 12 Browsers' Market Share
- Dynamic charting of browser, device, date ranges, and countries' data.
Code Editing Applications
To keep code we write free from proprietary markup added by applications like Microsoft Word, web designers type in plain text editors. These editing applications typically include numbered lines, search and replace, color-coded code/markup, error checking, and sometimes file management.
If you already have a favorite code editor, feel free to continue using it. If you’ve never written web page code before, then continue to the installation lesson below.
Install one Editor application:
- Mac:
- Windows and Linux:
- Adobe Creative Cloud: may be free for students at OSU. Inquire.
File Transfer Applications
There are a variety of ways to create folders and files and move those files from hard drives to web servers. Web servers need excellent security, however, to ensure they are not hacked by malicious actors during or after file transfers. Hackers attempt to hack all websites frequently, so using multiple layers of security is crucial.
These are some of the technologies that web developers use to secure the connection between the hard drive and web server:
- Secure Shell (SSH)
- Secure File Transfer Protocol (sFTP)
- Secure Socket Layer (SSL)
- Transport Layer Security (TLS)
- 2-factor authentication (2FA)
OSU Web Servers
OSU students use Duo to manage 2-factor authentication on ONID and ENGR web servers, which will make using file transfer functions more difficult for beginners. To simplify the web server connection set up, we will map the web server to the hard drive. We’ll do that rather than install file transfer software (which would also require using a terminal, several unix commands, text editing, and additional login tasks).
Jump down to see the Macintosh instructions. Jump down to see options for non-OSU students.
Windows mapped drives
If your computer is running Windows, use these instructions to map your OSU ONID web server to the hard drive:
- If you are off campus, you must connect to the OSU Virtual Private Network (VPN) first, to improve security of the transfer.
- Launch a new Explorer window.
- Click on the This PC icon which is in the list on the left side of the screen. Choose the Computer Tab, near the top. Choose Map Network Drive from the Map Network Drive menu.

- From the Drive menu, choose the Y drive (or any letter that is free).
- Type this in the folder field:
\\onid-fs.onid.oregonstate.edu\USERNAME
Change USERNAME to YOUR ONID username.
- Click Finish.
- When prompted for your credentials, type your ONID email address:
username@oregonstate.edu and password. - Now, to view that drive (and eventually transfer files to it), look at the Explorer window again and scroll to This PC to see it listed. Click on it to view the public_html folder. This public folder is where we’ll place files that we want the world to see.


Macintosh mapped drive
If your computer is running MacOS, use these instructions to map your OSU ONID web server to the hard drive:
- If you are off campus, you must connect to the OSU Virtual Private Network (VPN) first, to improve security of the transfer.

- From the Desktop, click the Go menu and choose Connect to Server.

- Type smb://onid-fs.onid.oregonstate.edu/public_html into the empty field.
OR, instead of public_html, you may need to type your ONID username.
OR, instead, you may need to type
sftp://shell.onid.oregonstate.edu/username.


- Click Connect to view that drive.
- When prompted for your credentials, type your ONID email address:
username@oregonstate.edu and password. - If you got connected, then be sure to click the + button on the
screen to add the connection address for later use.
- Now, to view that drive (and eventually transfer files to it), locate the public_html server/drive in the list of drives on the left of the Finder window:

Click on it to view the drive. If you’ve never placed files there, it will be empty. This public folder is where we’ll place files that we want the world to see.
Optional file management applications for non-OSU students
Other web hosts, such as GoDaddy and Bluehost, provide File Management software when logged into your account, such as Plesk and cPanel.
For web authors wanting more control over file structures, changing permissions, and viewing information about files, a plethora of other options exist. I have tested and trust these options, many of which are free and/or available on OSU lab computers. These will work with public keys (not for beginners):

An online search will produce a long list of other options.
Image Editing Applications
Professionals use Adobe Photoshop, FireWorks, and/or Illustrator to edit images for the web. They may also use Adobe’s Creative Cloud Apps:
![]()
Professionals on a low budget might use Gimp.
For this course, we’ll use free and less complicated applications.
Photo editing
One of these may already be installed on your computer; but if not, install the one for your platform:

Vector Drawing
Use one the following for creating logos:
There are other fun options online for making background and foreground graphics, which you are not allowed to use for this course. You must create your own images to learn and practice new skills.
Check English Spelling and Grammar
Because we can’t easily check the spelling of text that is not code from inside a code editing application, additional browser tools are needed to streamline the process of spelling and grammar checking the content of web sites.
Install one of these Chrome browser extensions:

After installation, practice using it…select this text to test it:
1 2 3 | i'm a third year OSU student majoring in economics and minoring in business. I worked with professional appartment maintenence and used to coach football. I aiming for a job in a fortune 500 compny. |
Did your new tool find all seven spelling errors?
Misspellings in your assignments will reduce your score. Install a website spelling and/or grammar checker and use it every time you edit.
Install Software (OSU)
Some answers require multiple selections before an accurate score is revealed. Take the quiz as many times as you like.
Congratulations - you have completed Install Software (OSU).
You scored %%SCORE%% out of %%TOTAL%%.
Your performance has been rated as %%RATING%%
Your answers are highlighted below.
Chat with the instructor in Canvas
[quick-chat room=”install” guests_visible=”1″ send_button=”1″]Internet Overview
The basic function of the ‘internet’ is that individuals share content with others via a web server. The web server is a computer that allows secure transfer of files to and from its disc so that they can be viewed by anyone in the world, a select group, or by individuals.

A computer connects via wifi to routers which connect to modems via Ethernet cables. Modems then connect to Internet Service Provider (ISP) web servers via fiber optic or copper cables. ISPs share the server web pages with other ISPs around the world via satellite, fiber optic, or 3G/4G/5G data signals. To connect servers from different continents, a network of undersea fiber optic cables have been added to the infrastructure.
How the Internet works
History of the Internet
How did the Internet get started and what does it look like? Take a quick glance at The Internet Society’s timeline:

All of your links must be assigned at least to one category to be displayed
Introduction to Web Design
ObjectivesHistory of Web DesignWhat is design?TraitsRequired SkillsSkills to learnObligationsQuiz
Objectives
As noted in the course syllabus, the learning outcomes for the Web Design course are to:
- Understand and discuss the language of the Internet and web page authoring.
- Demonstrate the development process.
- Demonstrate best practices.
- Envision, design, prototype, produce, test, and promote a web site with consistent and meaningful navigation, quick-loading images, and compliant HTML and CSS.
- Recognize good navigation and compliant code.
This rigorous course, if you choose to fully engage in the lessons, will prepare you for professional-level web authoring.
View the Evolution of Web Design 1990-2019 by Red Stapler.
Or scroll thorugh Designmodo’s The Short History of Website Building infographic.
What does it mean to design a web site?
The answer is at the same time simple and complex. These jobs can be done by one author or many specialists:
- Marking up text with a current version of HTML.
- Designing with cascading style sheets (CSS).
- Designing with images.
- Programming efficiencies with scripts and databases.
- Writing for an online audience.
- Hosting on secure and unsecure web servers.
- Testing in various browsers on various platforms and devices.
- Promoting the site to various audiences.
Web sites can come together in many ways; from marking up text in a word processing document to building your own hosted online applications. Review the order of complexity below. CS 195 will work with level 3 to 7 and CS 295 will work with level 3 to 10.
- Write in a freely hosted web service site such as FaceBook, WordPress.com, LinkedIn, Twitter, etc.
- Write in a word processing document and transfer it to a web server (.txt, .doc, .gdoc)
- Write in a text-editing application, save/export the file as .html, and transfer it to a web server.
- Write in a site management application, save the file as .html, xml, or php, and transfer it to a web server.
- Level 4 plus styling with a Cascading Style Sheet (.CSS).
- Level 4 and 5 plus graphic design and optimization of images.
- Leve 5 plus client-side scripts (JavaScript and Ajax, for example).
- Level 6 plus service-side scripts (.PHP for example).
- Level 7 plus activating and interacting with a database (MySQL, for example).
- Configure an installable Content Management Systems (Drupal and WordPress, for example) and design a theme.
- Design and produce plugin modules for installable Content Management Systems.
- Design Content Management Systems and plugins (Ruby on Rails, for example).
- Convert HTML5 websites to mobile applications.
Necessary Traits
This course will open up the possibilities available to you inside the Web. To be successful in this class and find the passion many of us have to use the Web to its potential, ascertain if you have most or all of these traits:
- Creative thinker,
- Troubleshooter,
- Investigator,
- Interested,
- Entrepreneurial,
- Available,
- Collaborator,
- Organized.
Challenge yourself to attain more of these traits than you have already. Think and work outside your comfort zone. Your brain will thank you!
Required Basic Skills
Learn these keystrokes

Use the common left-hand keystrokes to save your right arm from fatigue.
- Open Ctl+o.
- Quit Ctl+q.
- Save Ctl+s.
- Find Ctl+f.
- Copy Ctl+c.
- Cut Ctl+x.
- Paste Ctl+v.
- Undo Ctl+z.
- Select All Ctl+a.
Overuse of right-clicking will slow your progress and wear-out your right arm. NOTE: For Mac use ⌘ instead of Ctl.
Know each of these skills before you begin
- Turn your computer on and off.
- Turn the volume up and down.
- Adjust the screen brightness and contrast.
- Open an application/program.
- Make a new file in an application.
- Save Ctl+s and close a file.
- Reopen Ctl+othe file.
- Rename a file.
- Find/search Ctl+f a file.
- Copy a file from one folder/directory to another.
- Copy a file or folder/directory from the hard drive to another device.
- Back up files to a USB or cloud drive.
- Connect to the internet.
- Setup an email account.
- Update the name that will show when someone receives the email.
- Add an email signature.
- Set new messages to retain the original message when replying.
- Send and receive email.
- Attach a document to an email.
- Download email attachments and file them on your hard drive.
- Search for a file online.
- Download a program, Acrobat (.pdf) file or picture file.
- Decompress an archive file (.ZIP)
Listen instead of read
![]()
Too tired to read carefully? Use these instructions to set up your computer so it can read for you!
Skills you will learn in the course
Web Design course
How to…
- Connect to a web server using secure File Transfer Protocol (sFTP).
- Write, upload, view, and test HTML5 files.
- Write, upload, view, and test CSS files.
- Write, upload, view, and test PHP files.
- Design page layout, text, and shapes using code.
- Open, enhance, optimize, and save image files in various formats for online use.
- Organize folders/directories and files.
- Backup files.
Understanding your obligations
Learning new skills can be frustrating for some. Sometimes this frustration is a direct result of poor teaching, poor listening/watching skills, lack of experience with pre-skills, or other distractions. And sometimes, the frustration is normal! Learning is not something that is easily acquired the first time it is heard or seen. A learner must experience the task first hand and practice it, again and again, to fully understand and make it part of rote memory.
Learning in a classroom or online can be particularly trying when the purpose of the task to learn is not clear, the computer you use is unfamiliar, or other students progress at a different pace. Experienced educators who teach in a computer lab situation know that not all students will listen and watch carefully, stay together, or tell the instructor when he/she is going too fast. Some educators create and print extensive tutorials for students to use in their learning only to find out they are not used. Many students want instructors to do the work for them because they do not want to struggle. Learning computer skills is like playing a game…you must explore like a detective to persevere. If you are not willing to fully engage in the material, stay on track, and ask questions then these courses are not for you!
If you are learning a new skill and don’t feel you have a complete handle on it, try showing someone else. Sharing and teaching is one of the best ways to learn something well (fully understand and retain the new knowledge). Dr. Gary Phillips of the National School Improvement Project (based on Piaget’s theories about learning) makes this claim: People retain learned material at the following levels:
- 10% of what we hear
- 15% of what we see
- 30% of what we see and hear
- 80% of what we experience actively
- 90% of what we teach others
Introduction
Congratulations - you have completed Introduction.
You scored %%SCORE%% out of %%TOTAL%%.
Your performance has been rated as %%RATING%%
Your answers are highlighted below.