File permission errors are corrected using a terminal or right-click menu.
If, when viewing a file in the browser, an error message appears that says the page cannot be viewed or it is only ‘writable’, then the file or its parent folder has a permission problem.
If you want to set an entire folder at 755, so that all its contents get the same permission setting, right-click on the parent folder, which is ONID for OSU students. Choose New Terminal from the popup menu. Type: chmod 755 -R about. Replace the ‘about’ folder name with any other folder name that needs Recursive permissions.
Using CodeAnywhere, ShiftEdit, FileZilla, WinSCP, or Dreamweaver
Right-click on the folder or file on the remote server.
Choose Properties or Permissions, depending on the software.
Change permissions to 755, which looks like this: When set to 755, the owner is the only one who can write to that file. Groups and the Public can read and execute it, which is important for the markup, styles, and functions to behave properly.
Some File Transfer software might require you set the file permissions for an entire folder before you begin adding files to it. For new files and folders, update the preferences so that new ones are automatically set to 755: File→Preferences→search FTP. Click on FTP and update the permissions. Click Submit.
Resources
All of your links must be assigned at least to one category to be displayed
The cPanel File editor application is a text-editing and file management application that runs right in the browser. It provides editing in most computer programming languages, a secure connection to your web server, and backup with a .zip archive.
It will allow you to work on files remotely on your server using File Transfer Protocol (FTP). Some cPanel applications for different hosting companies allow you to Securely transfer files using Secure File Transfer Protocol (SFTP). This keeps hackers from intercepting transfers and changes. In the future, use an application with SFTP capability to avoid problems.
The file manager provides editing of various programming languages, which for the purposes of this course, is HTML5, CSS, JavaScript, and PHP.
In cPanel, scroll or search for the File Manager.
Click the File Manager icon.
Click the HTML Editor.
Remote editing with an SFTP connection
To connect to the web server from another application, such as CodeTasty, CodeAnywhere, NotePad++, FileZilla, ShiftEdit, etc., locate the servier’s hosting address for SFTP or SSH.
In the Connection settings of your editing and/or filemanagement application, type the correct values:
Name: My Web Server
Authentication type: Password.
Host:
Username: Your account user name.
Password: Your account password.
Click the Save button.
Backup. cPanel and other editing and file manager applications let us create folders and files directly on the web server and transfer (copy/backup) to our local hard drives for safe keeping. Right-click on the folder and → Download to a .zip archive. If you are using Dreamweaver, or NotePad++ then you’ll create files on the local hard drive first then transfer/copy them to the server. Always maintain two copies…one on the server and at least one on the hard drive.
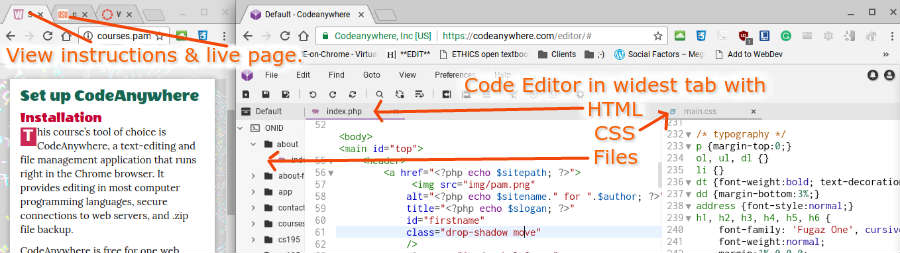
Set up Screens so that you have room to edit and view your live page without flipping to another screen.
This course’s tool of choice is CodeAnywhere, a text-editing and file management application that runs right in the Chrome browser. It provides editing in most computer programming languages, secure connections to web servers, and .zip file backup.
CodeAnywhere is free for one web account, which will be your ONID or ENGR web account. If you want to set up more hosting servers, then you may purchase the premium application. CodeAnywhere will allow you to work on files remotely on your server then back them up to your hard drive using Secure File Transfer Protocol (SFTP). CodeAnywhere provides editing of various programming languages, which for the purposes of this course, is HTML5, CSS, JavaScript, and PHP.
In a previous lesson, you were instructed to launch CodeAnywhere from the Chrome browser.
Click the G+ (Google) button to login with your OSU ONID/Google Account.
If you already own Dreamweaver on the computer you’ll use for class, then don’t install ShiftEdit or CodeAnywhere; you won’t need it. Instead, set up Dreamweaver.
Connect
With Chrome and CodeAnywhere open, set up a connection to yourpublic_html web server folder:
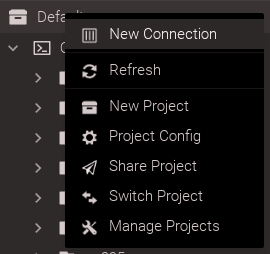
On the left sidebar menus, right-click on the default menu.
Choose New Connection
Choose SFTP from the menu.
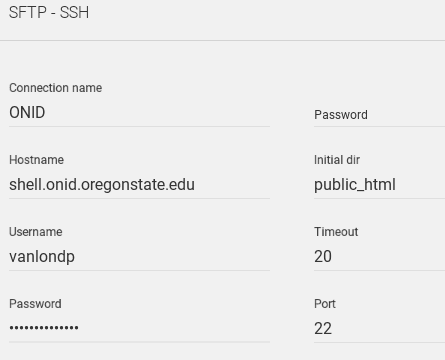
On the Connection screen, type the correct values:
Name: ONID
Authentication type: Password.
Host: shell.onid.oregonstate.edu
Username: Your ONID user name.
Password: Your ONID password.
Click the Connect button.
Change the theme.
From the Preferences → User → General menu, select a new Theme and color scheme if you don’t like white text on a dark background. If you like black on white, then choose the white theme and color scheme.
Backup. CodeAnywhere lets us create folders and files directly on our ONID servers and transfer (copy/backup) to our local hard drives for safe keeping. Right-click → Download to a .zip archive. If you are using Dreamweaver, then you’ll create files on the local hard drive first then transfer/copy them to the server. Always maintain two copies…one on the server and at least one on the hard drive.
Set up Screens so that you have room to edit and view your live page without flipping to another screen.
The CodeTasty web application is a text-editing and file management application that runs right in the Chrome browser. It provides editing in most computer programming languages, secure connections to web servers, and .zip file backup.
CodeTasty is free for one web account, which will be your ONID or ENGR web account. If you want to set up more hosting servers, then you may purchase the premium application. CodeTasty will allow you to work on files remotely on your server then back them up to your hard drive using Secure File Transfer Protocol (SFTP). CodeTasty provides editing of various programming languages, which for the purposes of this course, is HTML5, CSS, JavaScript, and PHP.
In a previous lesson, you were instructed to launch CodeTasty from the Chrome browser. If you already own Dreamweaver on the computer you’ll use for class, then don’t install CodeTasty; you won’t need it. Instead, set up Dreamweaver.
Define a userID and and strong password.
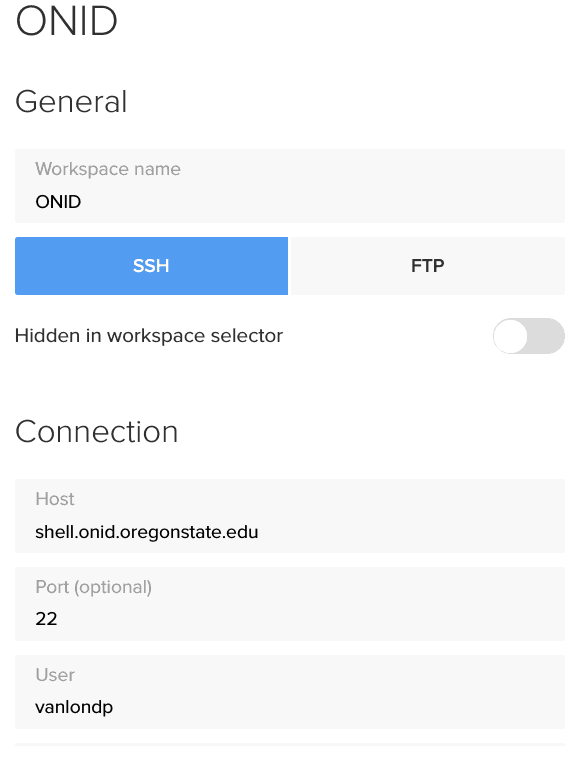
Click the Workspaces menu on the top left then choose Add a new workspace + link. Name the workspace “ONID”.
Choose SSH. This means you’ll connect with a secure shell file transfer protocol.
In the Connection section, type the correct values:
Name of this connection: ONID
Authentication type: Password.
Host domain address: shell.onid.oregonstate.edu
Username: Your ONID user name.
Password: Your ONID password.
Initial directory/path: public_html
Click the Save button.
Change the theme.
From the Preferences → User → General menu, select a new Theme and color scheme if you don’t like white text on a dark background. If you like black on white, then choose the white theme and color scheme.
Backup. CodeTasty lets us create folders and files directly on our ONID servers and transfer (copy/backup) to our local hard drives for safe keeping. Right-click → Download to a .zip archive. If you are using Dreamweaver, then you’ll create files on the local hard drive first then transfer/copy them to the server. Always maintain two copies…one on the server and at least one on the hard drive.
Set up Screens so that you have room to edit and view your live page without flipping to another screen.
Use FileZilla to connect to web servers, backup files, update file permissions, and upload/download when you use a text Editor that doesn’t include FTP capability.Downloadthe application, then connect using the FTP host address, your username and password, and port 21.
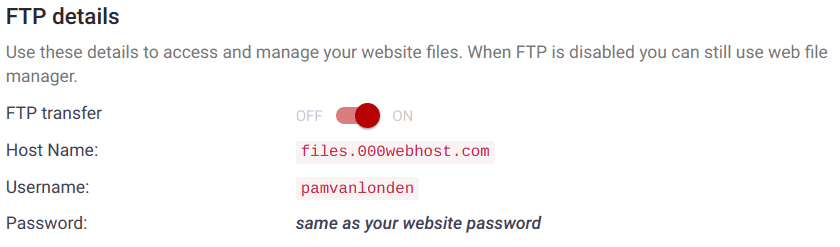
Connect FileZilla to 000webhost.com
For the Host field, type the host name/address for File Transfer Protocol (FTP) that represents the web server:
1
files.000webhost.com
For the Username field, type your 000webbhost username.
For the Password field, type your 000webbhost password.
For the Port field, type 21.
Click QuickConnect to connect to your web server.
When connected, the web server files will show on therightwindow, which is called theRemotewindow.
Click into thepublic_htmlfolder to view the contents of your web server.
All files for this class will be transferred into this folder.
In theleftwindow, click into your hard drive’s file structure to a folder that includes web files for this class.
If you have no web files yet, thenmake a folderon the hard drive to save your files to.
The Anywhere web application is a text-editing and file management application that runs right in the Chrome browser. It provides editing in most computer programming languages, secure connections to web servers, and .zip file backup.
CodeAnywhere is free for one or more web accounts and can be used with the free 000WebHost.com account. If you want to set up more hosting servers, then you may purchase the premium application. CodeAnywhere will allow you to work on files remotely on your server then back them up to your hard drive using Secure File Transfer Protocol (SFTP). However, 000WebHost.com does not provide Secure FTP; just FTP.
In a previous lesson, you were instructed to launch CodeAnywhere from the Chrome browser, or some other HTML editor.
Click the G+ (Google) button to login with your Google Account.
If you already own Dreamweaver or Notepad++ on the computer you’ll use for class, then don’t use ShiftEdit or CodeTasty; you won’t need it.
Connect
With Chrome and CodeAnywhere open, set up a connection to yourpublic_html web server folder:
On the left sidebar menus, right-click on the default menu.
Choose New Connection
Choose FTP from the menu.
On the Connection screen, type the correct values provided by the host company:
Name: 000WebHostApp
Authentication type: Password.
Host: files.000webhost.com
Username: Your 000webhost.com user name.
Password: Your 000webhost.com password.
Initial directory: public_html
Click the Save button.
Change the theme.
From the Preferences → User → General menu, select a new Theme and color scheme if you don’t like white text on a dark background. If you like black on white, then choose the white theme and color scheme.
Backup. CodeAnywhere lets us create folders and files directly on our web server and transfer (copy/backup) to our local hard drives for safe keeping. Right-click → Download to a .zip archive. If you are using Dreamweaver, then you’ll create files on the local hard drive first then transfer/copy them to the server. Always maintain two copies…one on the server and at least one on the hard drive.
Set up Screens so that you have room to edit and view your live page without flipping to another screen.
Hurrah! Your site is done and ready for the public. During the last class of the term, show off your work in class on your laptop. Invite your friends and colleagues. The public will be invited. Be prepared to show your website, its four languages, and talk about: Show off your site and its source code languages at the launch party.
The site’s intent.
Challenges and successes.
Long term plans.
Special functions.
Special design elements.
2017 launch party for Web Design students and their friends, co-workers, and facultyStudents show off their resume and website projects to family, friends, co-workers, and faculty.
Online students
If you are unable to present your site in person, please make a screencast and add it to your YouTube account. Use Screencast-O-Matic‘s easy recording functions to record a 3 to 5 minute presentation. When the movie is available at YouTube, send the instructor the address, or add the address to the Peer Review (edit your initial thread to add it). She will score it by the end of finals week.
Cookies: “It’s important to be aware of your cookie settings because cookies can allow sites to track your navigation during your visit to those sites.”
Transfer files with a secure connection
Encrypted WiFi connection
Secure FTP (SFTP) or Secure Shell
Logout when idle.
Browse and view media files with security features turned on.
Cookies: “It’s important to be aware of your cookie settings because cookies can allow sites to track your navigation during your visit to those sites.”
Determine which character encoding is most secure and current. UTF-8 and ISO-8859-1 are the most common.
Put code/scripts in a separate directory outside the document root.
But do not put general purpose interpreters, such as perl, PHP, or shells, in the cgi-bin directory.
Store database account name and password in a file outside the web directory tree.
Is moving wp-config outside the web root really beneficial?
Recode dynamically generated pages to validate output.
Code sites so they work with or without JavaScript.
Because JavaScripts can introduce insecurities, some uses keep it turned off in their browsers. Tools like NoScript make it easy to turn it on when viewing a trusted site.
“Any server that creates web pages by inserting dynamic data into a template should check to make sure that the data to be inserted does not contain any special characters (e.g., “<“). If the inserted data contains special characters, the user’s web browser will mistake them for HTML markup.” (CERT 2000)
Validate form data and disallow html and scripts in form fields.
Limit field data to what is needed and no more. For instance, if you ask for a person’s age in a form field, only accept numbers with 2 digits rather than any amount of any characters. In a name field, accept only a string of letters, periods, and hyphens. Apostrophes may allow SQL injections.
Validate/filter form data locally (during the output process) before it is rendered as part of the dynamic page.
If you validate form data with JavaScript, revalidate with your server script (in case JavaScript was turned off in the browser).
Don’t allow html tags in form textarea or input fields.
Add Captcha Image security functions to keep spambots from filling in your forms.
Examine and filter data stored in cookies.
It is a good practice to save the session data on the server, and use cookies or hidden variables just to pass a session identifier. (Apache)
Cookie data can be stolen by other web pages so don’t store sensitive data in them.
Don’t send scripts or personal form data via link tags.
Send forms with method=”post” rather than method=”get” as much as possible.
(W3 Schools)
With POST the form input is passed via standard input to the application; best for logged in sessions.
With GET the form input is added to the URL which is visible to users; so don’t use this option for sending personal data.
Don’t pass important information via hidden variables. For instance, a BuyNow button that shows pricing in a hidden field can easily be copied, altered, and sent back so a purchase is made with the wrong pricing!
Don’t list script errors on web pages that are launched.
They give away the vulnerabilities of the scripts.
For PHP Scripts
Upgrade to PHP 5.4 to eliminate common vulnerabilities.
Consider using methods like SUPHP to set permissions to read only.
This method can use an .htaccess file to handle permissions for complex database-driven web applications.
Read more: Secure PHP Pages with SUPHP: University of Virginia.
PHP’s security functions can all be turned on but many open source web applications cannot run with them on.
Remove all .phps or php.txt files from the server.
Create directories outside the server tree for session and sensitive data.
For SQL databases, read Sans.org’s Top 20 List.
Don’t list email addresses in web pages (Naves 2011).
Use forms instead.
Email addresses are siphoned off by hackers and used to create spam mail, phishing, and spoofing, denial of service attacks, impersonate you, hack into servers, etc.
Determine which character encoding is most secure and current. UTF-8 and ISO-8859-1 are the most common.
Put code/scripts in a separate directory outside the document root.
But do not put general purpose interpreters, such as perl, PHP, or shells, in the cgi-bin directory.
Store database account name and password in a file outside the web directory tree.
Is moving wp-config outside the web root really beneficial?
Recode dynamically generated pages to validate output.
Code sites so they work with or without JavaScript.
Because JavaScripts can introduce insecurities, some uses keep it turned off in their browsers. Tools like NoScript make it easy to turn it on when viewing a trusted site.
“Any server that creates web pages by inserting dynamic data into a template should check to make sure that the data to be inserted does not contain any special characters (e.g., “<“). If the inserted data contains special characters, the user’s web browser will mistake them for HTML markup.” (CERT 2000)
Validate form data and disallow html and scripts in form fields.
Limit field data to what is needed and no more. For instance, if you ask for a person’s age in a form field, only accept numbers with 2 digits rather than any amount of any characters. In a name field, accept only a string of letters, periods, and hyphens. Apostrophes may allow SQL injections.
Validate/filter form data locally (during the output process) before it is rendered as part of the dynamic page.
If you validate form data with JavaScript, revalidate with your server script (in case JavaScript was turned off in the browser).
Don’t allow html tags in form textarea or input fields.
Add Captcha Image security functions to keep spambots from filling in your forms.
Examine and filter data stored in cookies.
It is a good practice to save the session data on the server, and use cookies or hidden variables just to pass a session identifier. (Apache)
Cookie data can be stolen by other web pages so don’t store sensitive data in them.
Don’t send scripts or personal form data via link tags.
Send forms with method=”post” rather than method=”get” as much as possible.
(W3 Schools)
With POST the form input is passed via standard input to the application; best for logged in sessions.
With GET the form input is added to the URL which is visible to users; so don’t use this option for sending personal data.
Don’t pass important information via hidden variables. For instance, a BuyNow button that shows pricing in a hidden field can easily be copied, altered, and sent back so a purchase is made with the wrong pricing!
Don’t list script errors on web pages that are launched.
They give away the vulnerabilities of the scripts.
For PHP Scripts
Upgrade to PHP 5.4 to eliminate common vulnerabilities.
Consider using methods like SUPHP to set permissions to read only.
This method can use an .htaccess file to handle permissions for complex database-driven web applications.
Read more: Secure PHP Pages with SUPHP: University of Virginia.
PHP’s security functions can all be turned on but many open source web applications cannot run with them on.
Remove all .phps or php.txt files from the server.
Create directories outside the server tree for session and sensitive data.
For SQL databases, Sans.org’s Top 20 List.
Don’t list email addresses in web pages (Naves 2011).
Use forms instead.
Email addresses are siphoned off by hackers and used to create spam mail, phishing, and spoofing, denial of service attacks, impersonate you, hack into servers, etc.